Last Updated on 24. July 2023
This article provides an introduction to model-driven, end-to-end testing of enterprise applications and a technical deep dive into the A12 test automation toolchain.
- Almost all information needed for test automation of an A12 application is already available in its A12 models.
- The model-driven test automation tool ATA saves considerable implementation and maintenance overhead in test automation.
- The more precisely the identification of the widget is defined in the resolver, the more accurately and stably SmartID will later recognize and control the widget during test automation.
- The A12 UI Test automation catalog simplifies and accelerates the test automation of A12 applications significantly.
End-to-end testing involves testing an application’s workflow from beginning to end. This technique basically aims to simulate real user scenarios so that the system can be validated for integration and data integrity. Automated end-to-end testing usually consists of automated functional tests to ensure the correctness of the business cases provided by the application as well as automated integration tests to detect errors in the interaction between the components of the application.
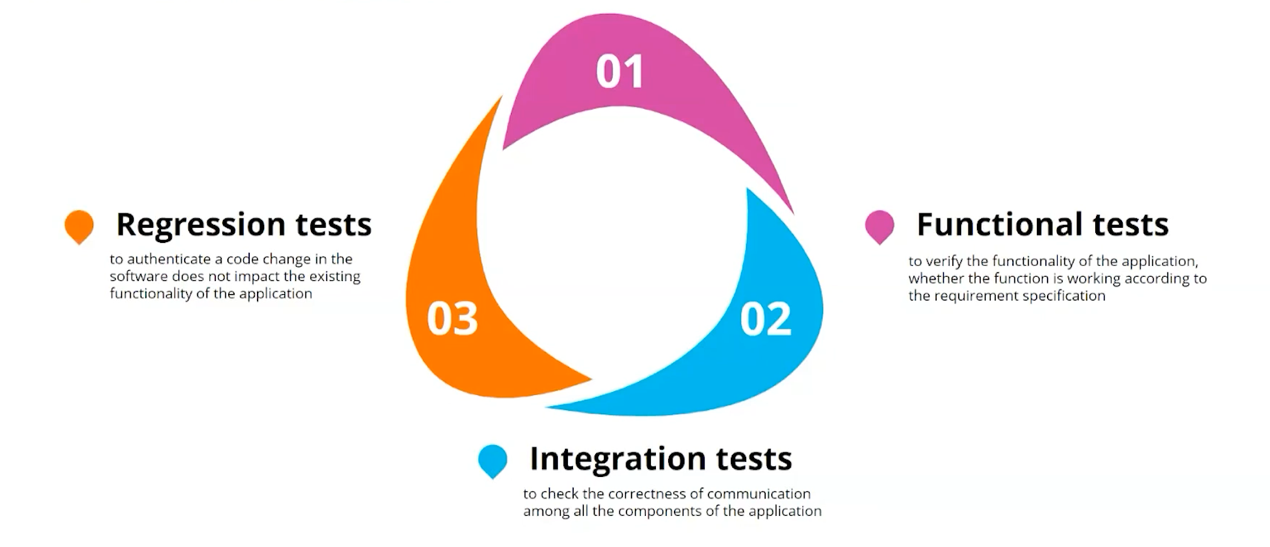
Once implemented, these tests can be repeated frequently and at almost no additional cost, either within a release cycle or from release to release. This testing practice ensures that an application still works as expected after any code changes, updates, or improvements. It guarantees the overall stability and functionality of the existing features.
In A12 a cross-platform tool for UI testing called QF-Test is used. With this tool, we automatically test Standard Widget Toolkit, Electron and web applications not only individually but also in interaction in a single test scenario. These tests run on Windows and on Mac as well.
For web testing, we use Edge, Firefox, Chrome and Safari. Moreover, we not only conduct cross-browser tests, but also cross-mobile and cross-tablet tests.
The number of A12 projects interested in test automation is increasing rapidly. It almost quadrupled compared to the previous year. What makes end-to-end test automation attractive for A12 projects? A12 provides an amazing catalogue of efficient test automation solutions that make test automation of A12 applications an enjoyable and rewarding endeavor.
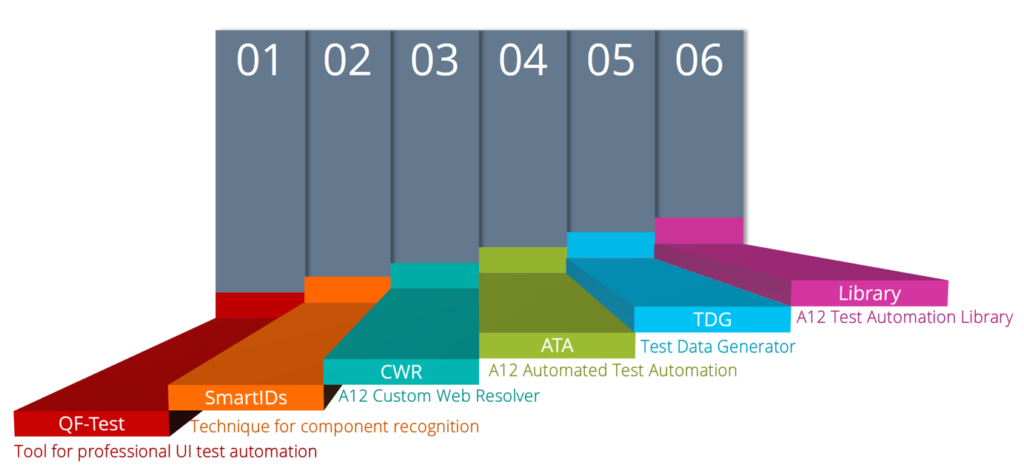
In this article we will mainly focus on one of the six pillars of the A12 solution catalog – the model driven test automation tool ATA.
ATA – the model driven test automation tool
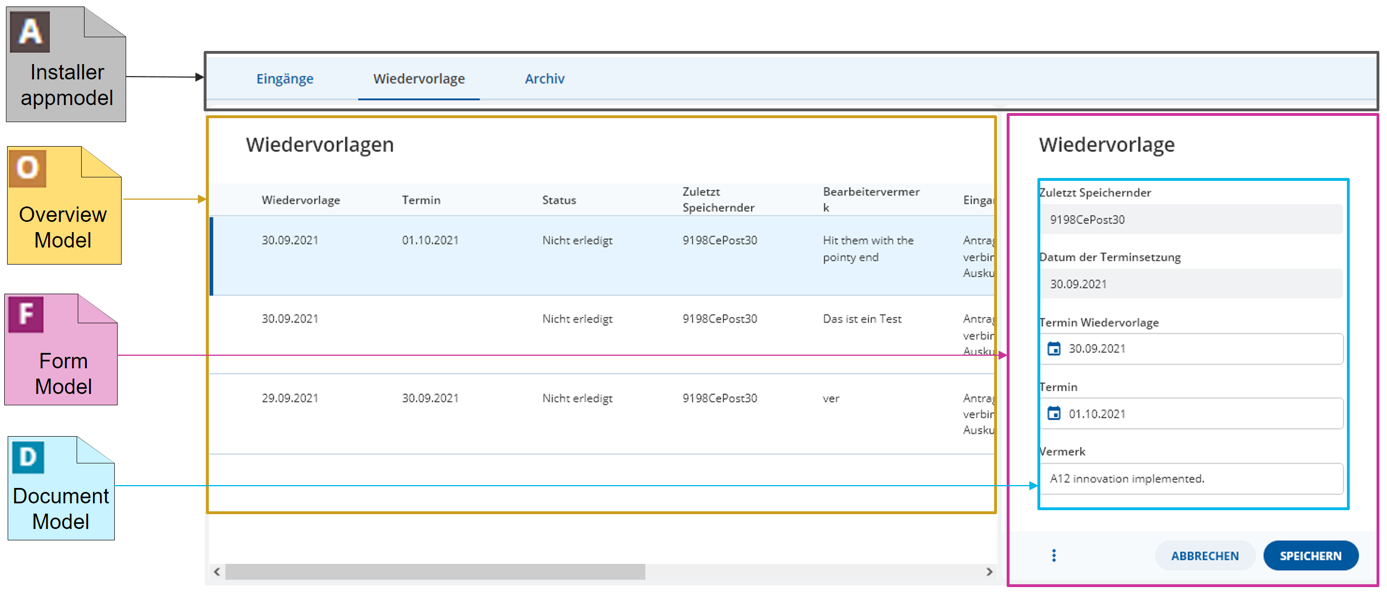
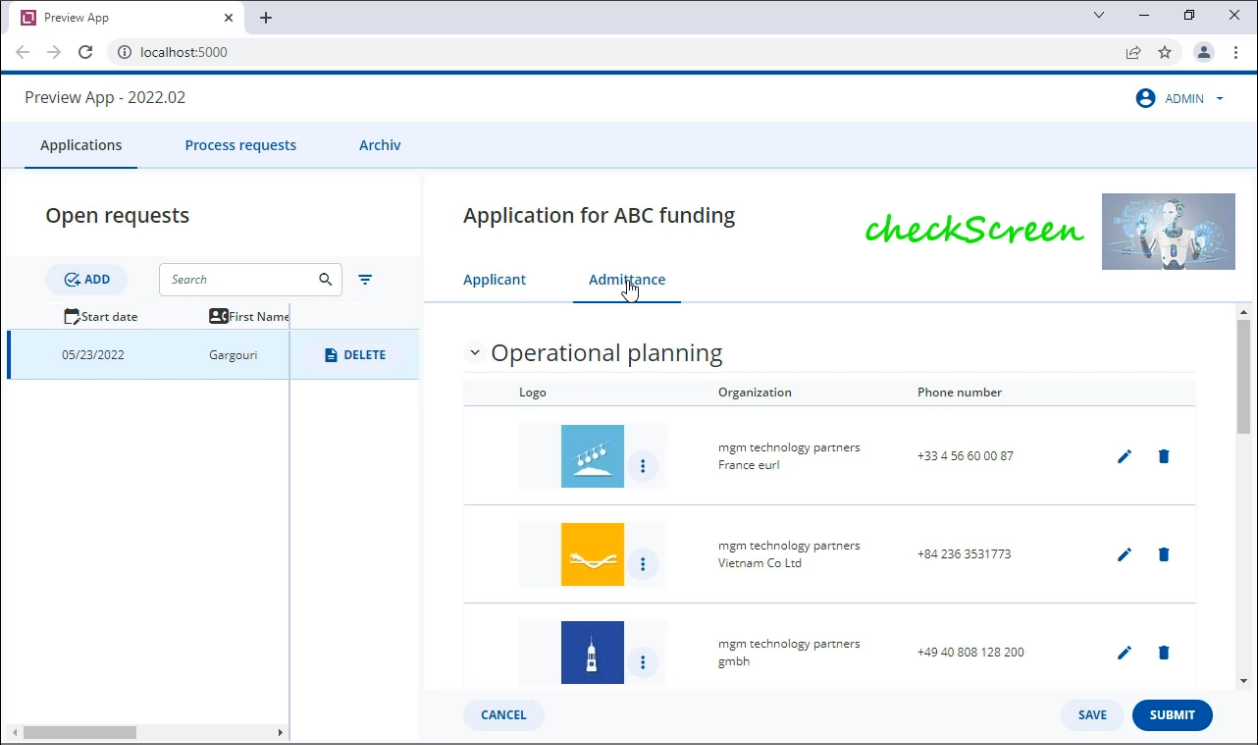
Let’s consider an HTML page of an A12 application. Each part of this page is derived from an A12 model. The navigation of the top is defined in the installer app model. The table on the left stems from the overview model. The right side is generated from the form model. The form model comprises one or more document models. In fact, almost all of the information needed for test automation of an A12 application is already available in its A12 models.
Typically an application consists of a main navigation, an overview table and forms or sections where you can enter, check and then submit your data. The most time consuming work is usually the implementation and maintenance of test automation code for filling and checking forms or sections. This work is not only exhausting, but also boring because it is a monotonous, repetitive implementation or adaption of similar code for filling or checking widgets like textfields, checkboxes, comboboxes and so on. But we don’t want to reinvent the wheel for every widget in every form and every A12 project. We are looking for efficiency in test automation.
A12 offers a low code, model driven end-to-end test automation tool called “A12 UI automated test automation” (ATA). This tool not only generates the test code needed for automation quickly and reliably, but also takes over the tedious task of filling and checking all forms in your A12 application.
If these forms change during the development process, the A12 test automation tool easily regenerates new test code so that test can run immediately. The following screenshots illustrate the efficiency and power of ATA.

As you can see on the right side, we are generating test code based on A12 models.
Next we open the browser of the A12 demo application with QF-Test.

Using the generated test code, ATA straightforwardly starts filling test data into all kinds of fields and repeats of the application.
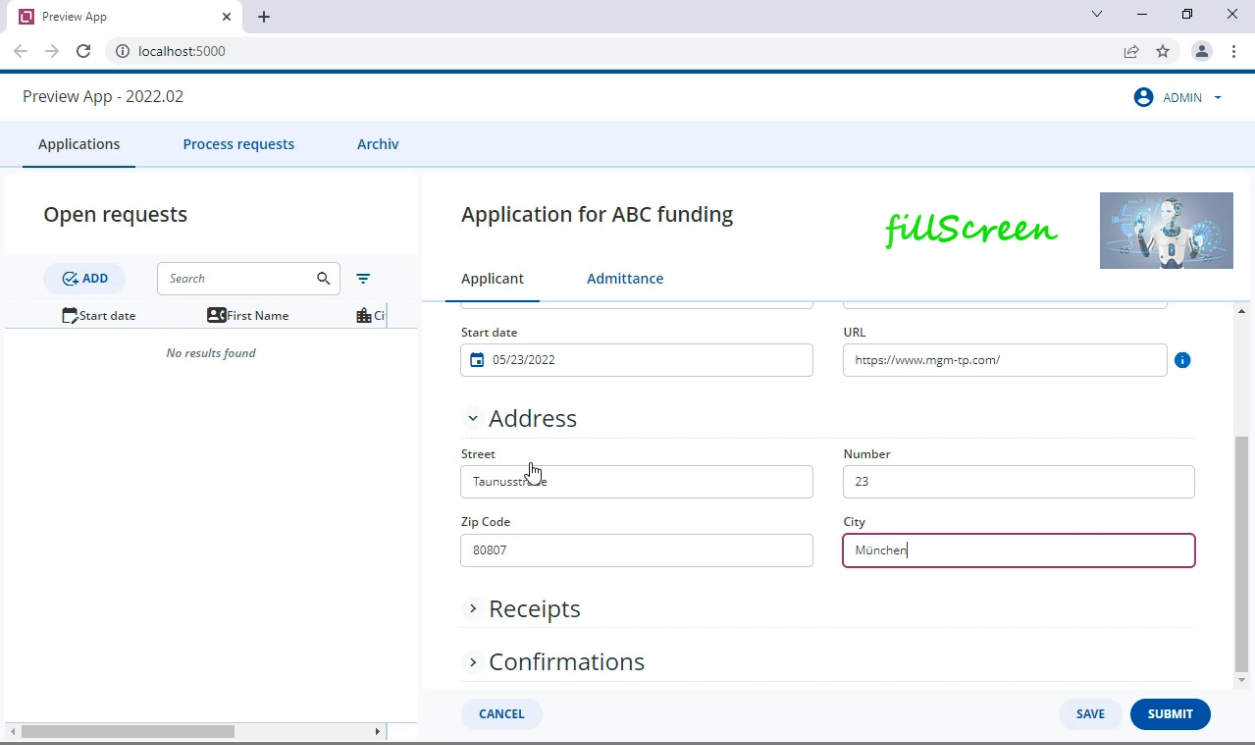
Afterwards, ATA will check the data entered, and finally it will submit the form.
The interesting part of this story is that we have not implemented a single line of code for filling or checking those screens. It’s all generic with zero effort.
This valuable tool not only generates the test code for automation quickly and reliably, but also takes over the exhausting and elaborate filling and checking of all screens in the application. This surely saves considerable implementation and maintenance overhead in test automation.
Thanks to ATA any A12 application, whether newly modeled or remodeled, can automatically be tested immediately allowing us to detect implementation and integration issues in added custom code very quickly.
ATA under the hood
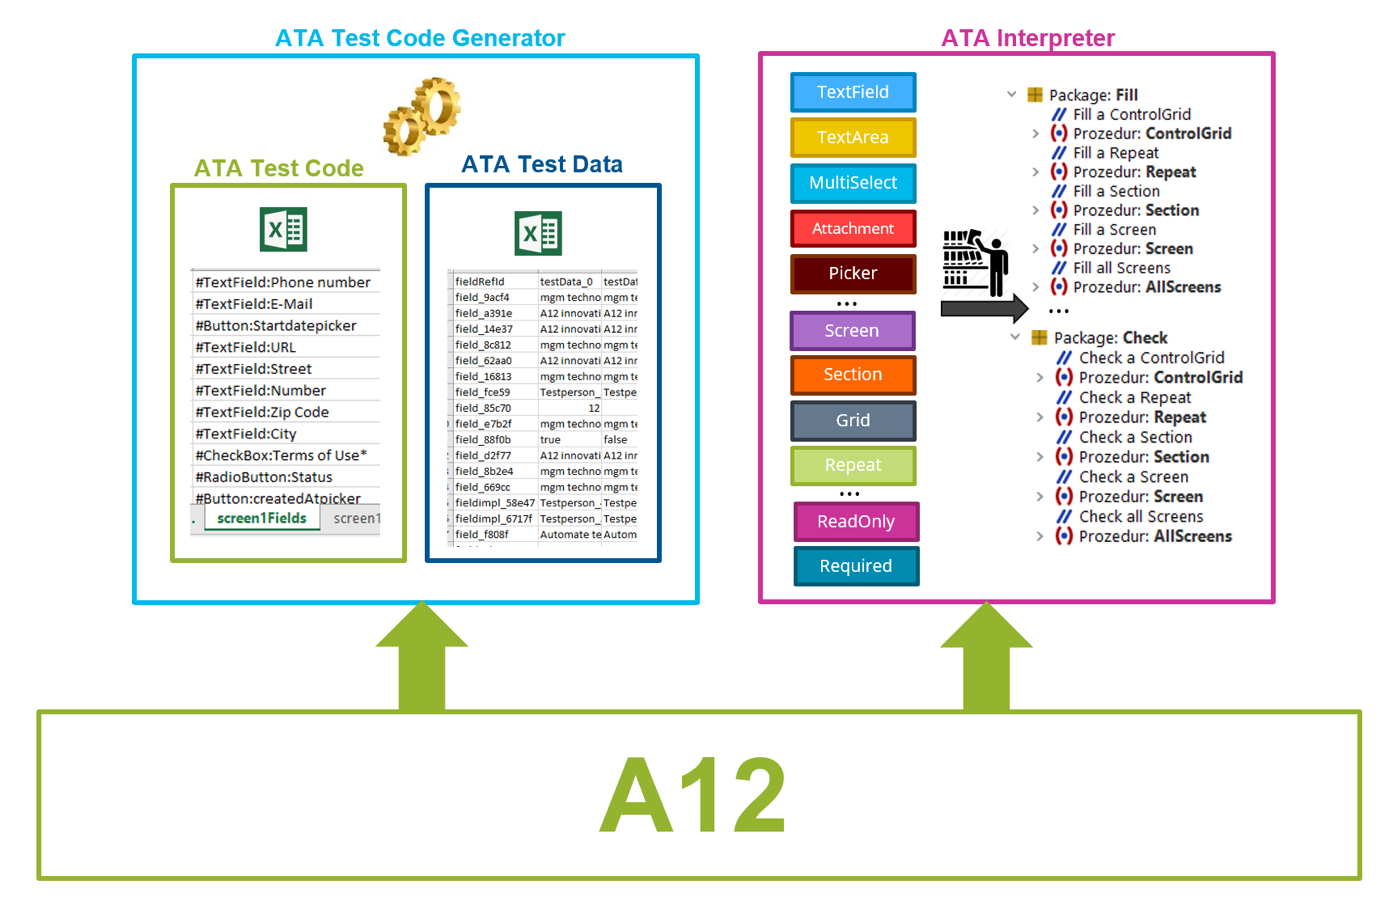
Based solely on the A12 models of an application the ATA generates the controls required for the test automation in forehand. The A12 application to be tested is not required and does not even have to be running at that time. In case the models change, most likely due to customer specific requirements, the generated test code will change accordingly.
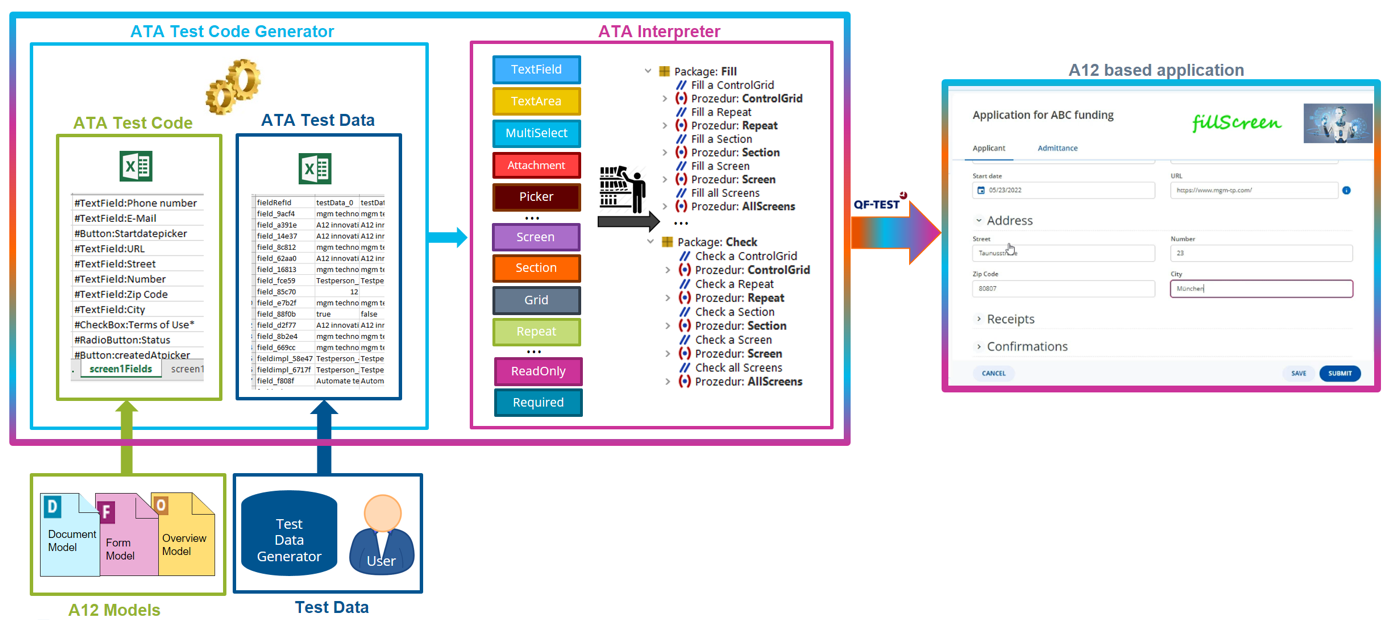
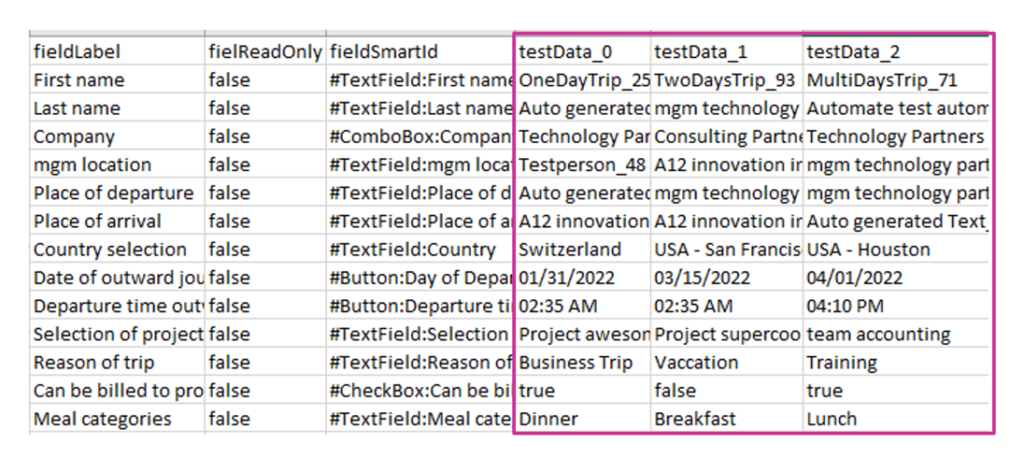
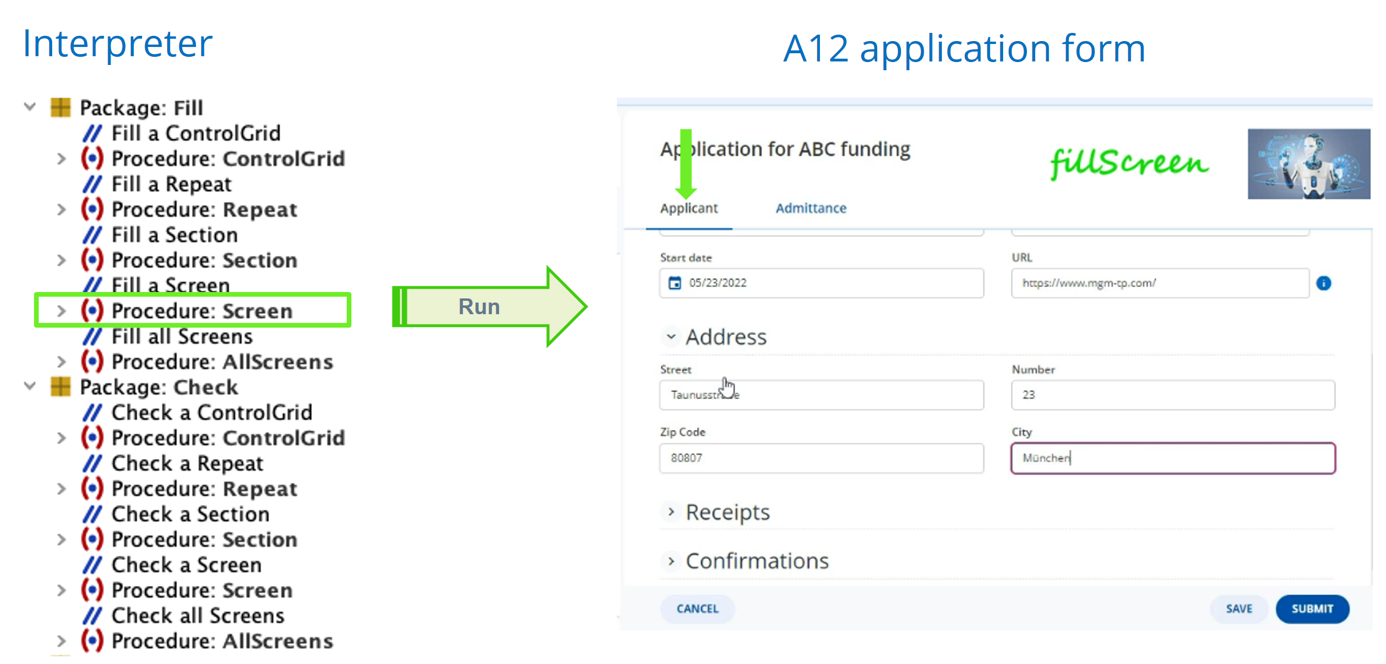
The test data will be obtained from the test data generator, or will be supplied by the user when testing with specific datasets. These generated controls and test data shall be read in by an interpreter. The interpreter contains a library with standard control methods like “set value” and “check value” for all kind of A12 widgets. Additionally, the interpreter is equipped with test execution strategies for filling and checking sections or an entire screen, for example, from top to button, or according to the sequence of fields given in a sample dataset.
To understand the usage of the ATA let’s take the test scenario from the above screenshots.
Despite the large number of input fields in each screen, the test code is amazingly low.
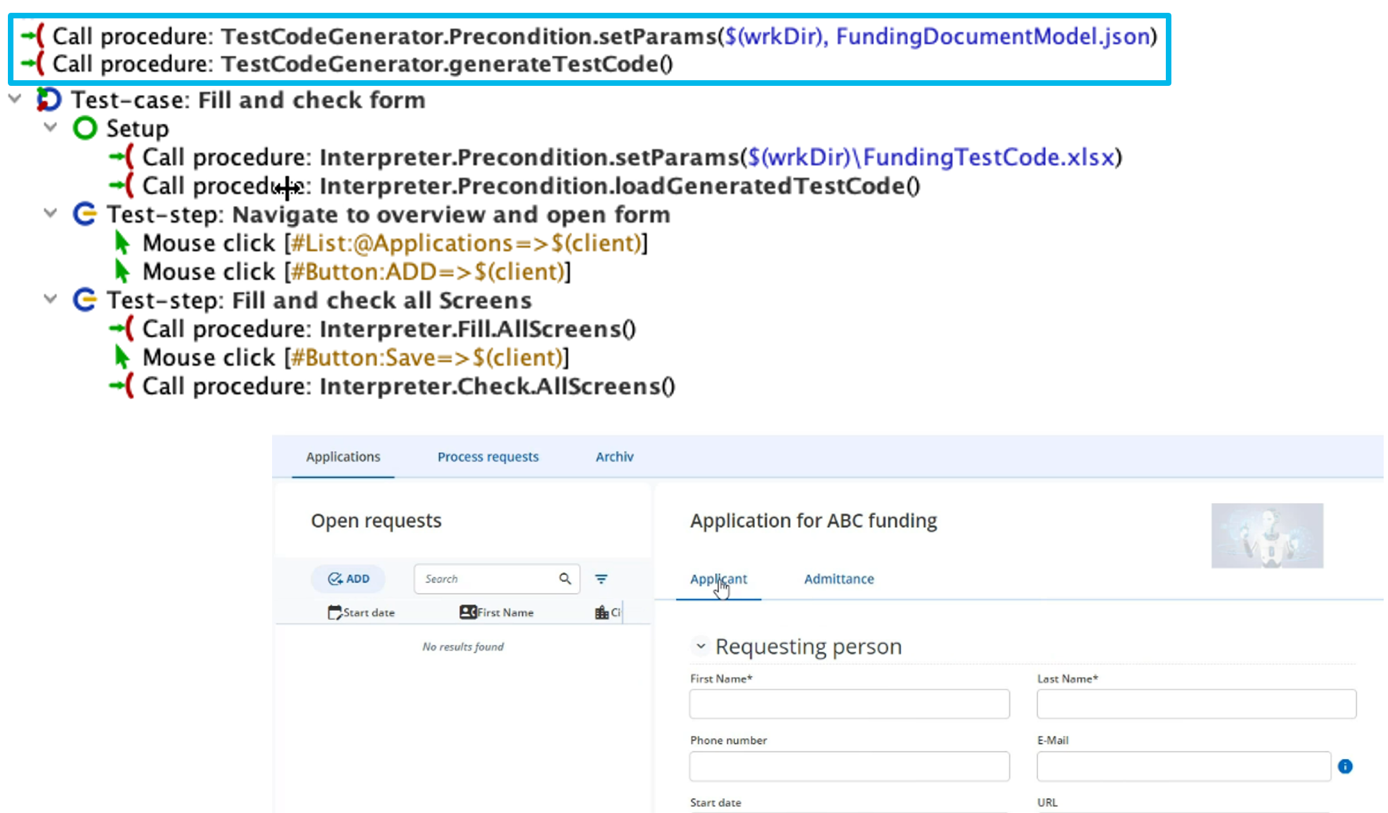
Firstly, we generate test code. The test code generation does not take place with each test run, but only on demand, usually once at the beginning or when models change. Next, we initialize the interpreter by simply setting the test code file. The interpreter fills and checks all fields of the form, regardless of how many screens this form comprises and regardless of how many fields and repeats each screen contains. By using ATA, the implementation effort has been significantly reduced to the navigation commands to the form, and what else we intend to do after submitting this form.
In case of feature changes or extensions in A12, especially in the widgets or in the model structure, ATA is being adapted to the respective A12 version accordingly.
Since these adjustments take place in A12 centrally, every A12 web project using the ATA is benefiting automatically.
The Custom Web Resolver and SmartIDs
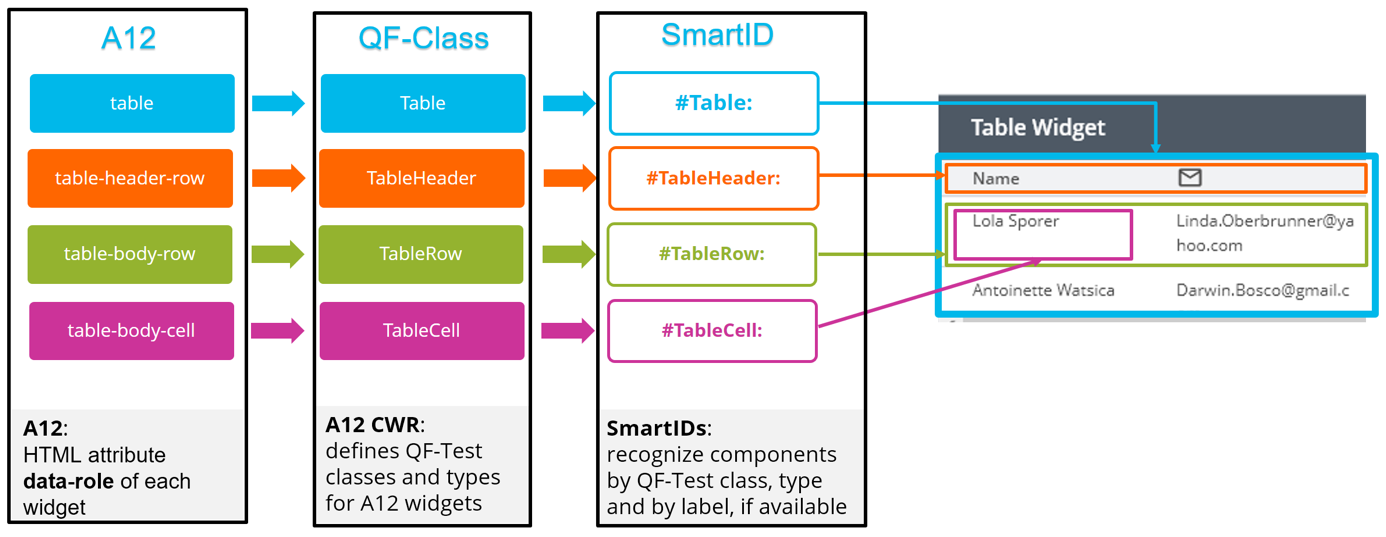
A12 provides a very essential software solution called A12 Custom Web Resolver (CWR).
This important component is responsible for the identification of each single A12 web widget needed for test automation. Therefore, this resolver contains a sophisticated mapping between the A12 widgets and the QF-Classes. In case of widget changes in A12, the A12 resolver is being adapted to the respective A12 version accordingly.
Let’s consider a brief example to illustrate the main role of this essential component:
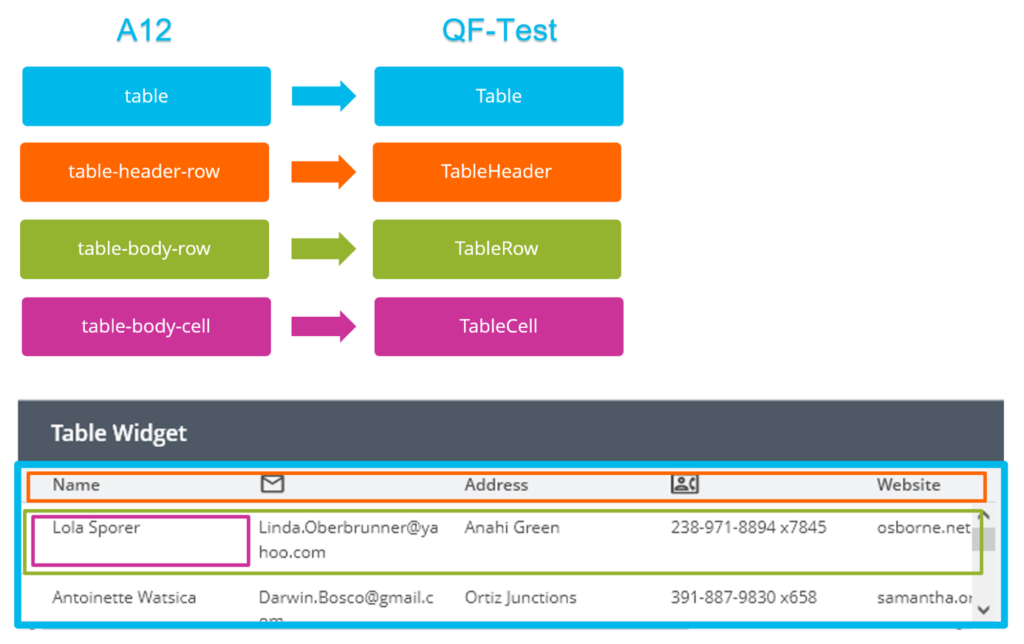
We have an A12 table widget, which we intend to use for test automation. Therefore, we map the HTML data-role attribute “table” to the “Table” class in QF-Test. In case we want to access every single part of the table during test automation, we extend the resolver by simply defining the respective mappings accordingly.
Thanks to these mappings, we are now able to accurately recognize this table and its sub elements by using a very intelligent and powerful technique for component detection called SmartIDs. The more precisely the identification of the widget is defined in the resolver, the more accurately and stably SmartIDs will recognize and control the widget during test automation.
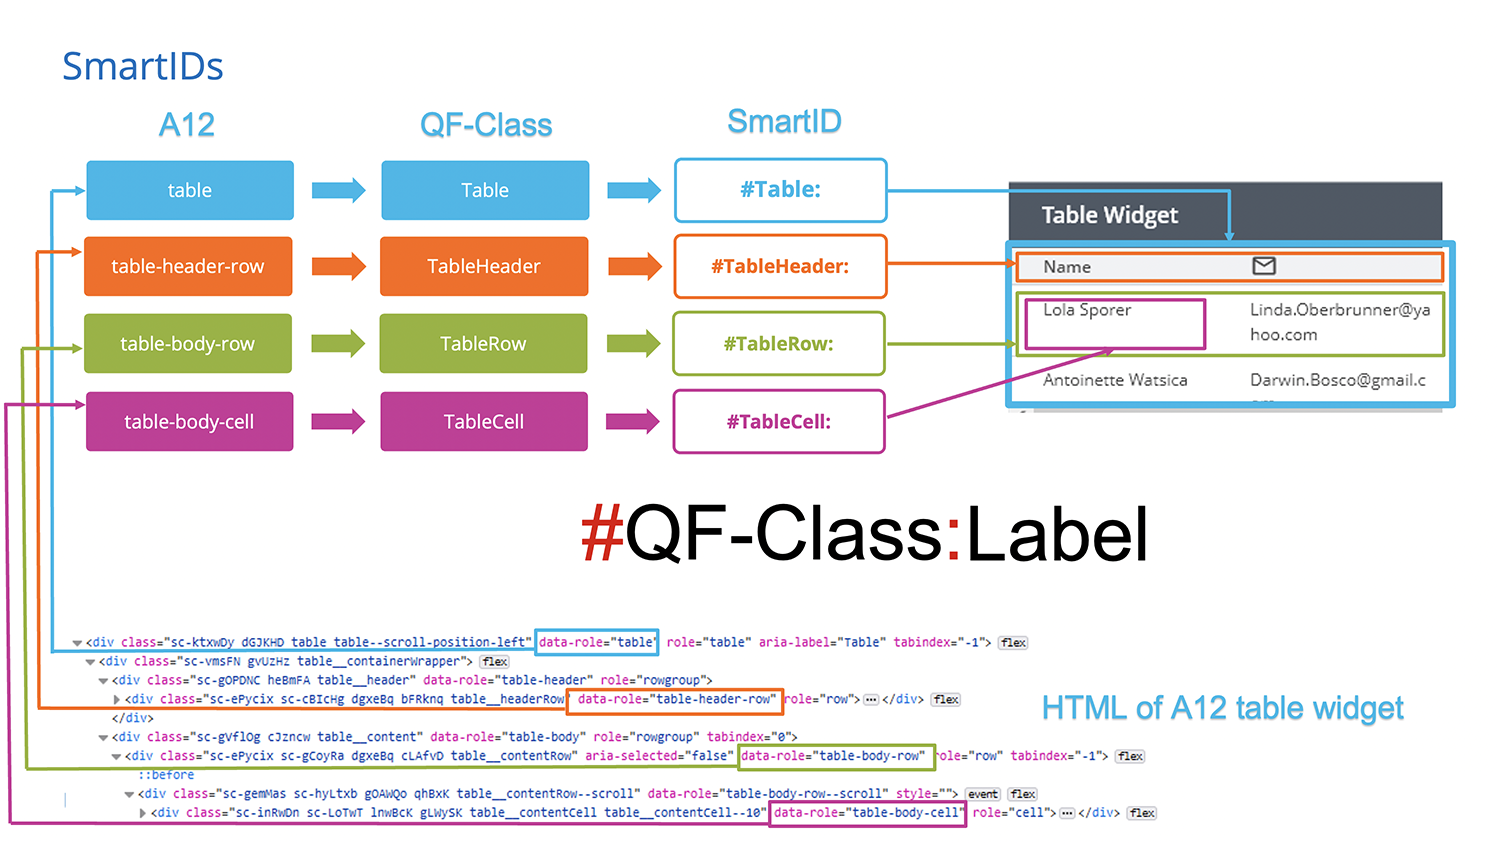
A SmartID can be expressed as follows: “#QF-Class:”. In case the widgets label is available, it can be appended after the colon “#QF-Class:Label”. In that case, the widget is identified by both, its QF-Class and its label. SmartIDs have further possible notations and can be also used by class type, by name, by index, and even within scopes. SmartIDs are so powerful, because they offer flexibility and generic use in test automation code.
To summarize:
- A12 provides an HTML attribute data-role for each A12 widget.
- The A12 resolver contains the mapping between the data-role of the A12 widget and the respective QF-Class.
- The SmartIDs are able to accurately recognize A12 widgets during test automation, among other things by their QF-Class, type and label, if available.
ATA test code generator
The ATA test code generator consists of a sophisticated collection of algorithms. These thoroughly extract from an A12 form model and its associated document models the information needed for test automation, such as the field type, field label, read only information and so on.
In case the document model includes further document models the test generator iterates recursively through the document models until the information needed for test automation has been completely extracted.
The test code generator assigns to each A12 field type the according QF-Class. Afterwards based on these QF-Classes and field labels (if available) it generates the corresponding field SmartIDs.
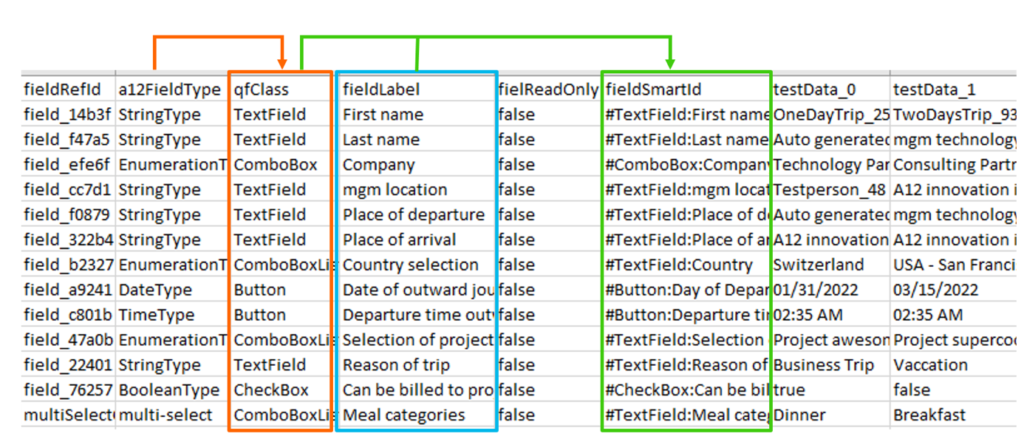
We also need appropriate test data so that the interpreter is later able to fill the form fields automatically. These test data will be obtained from test data generator or will be supplied by the user when testing with specific datasets.
When testing, you may also want to perform some checks such as “required” or “read only” field checks. The required field information is extracted from the document model. The “read only” information on the other hand is obtained from the form model. Based on these information, the interpreter performs the respective checks when running automated tests.
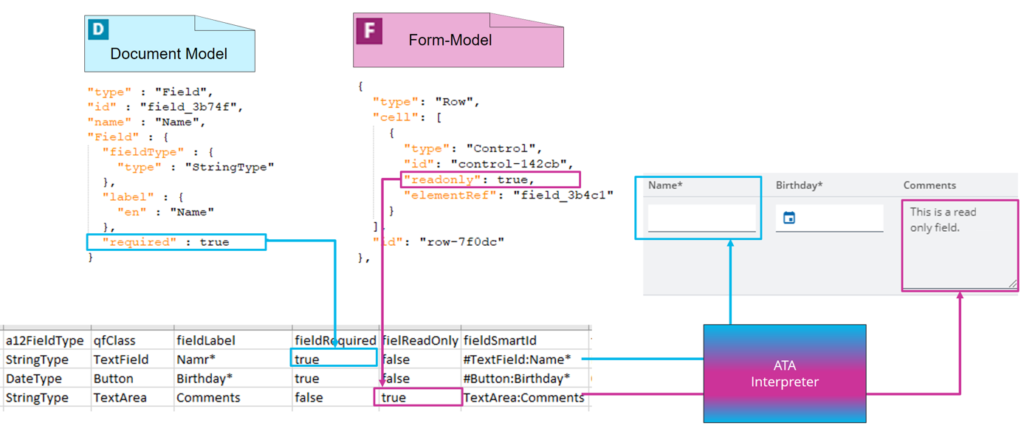
As a side note, the “required field”-asterisks is in fact always implicitly tested via the SmartID by label. In case the asterisk is missing on the UI, the SmartID by label throws a “component not found” exception.
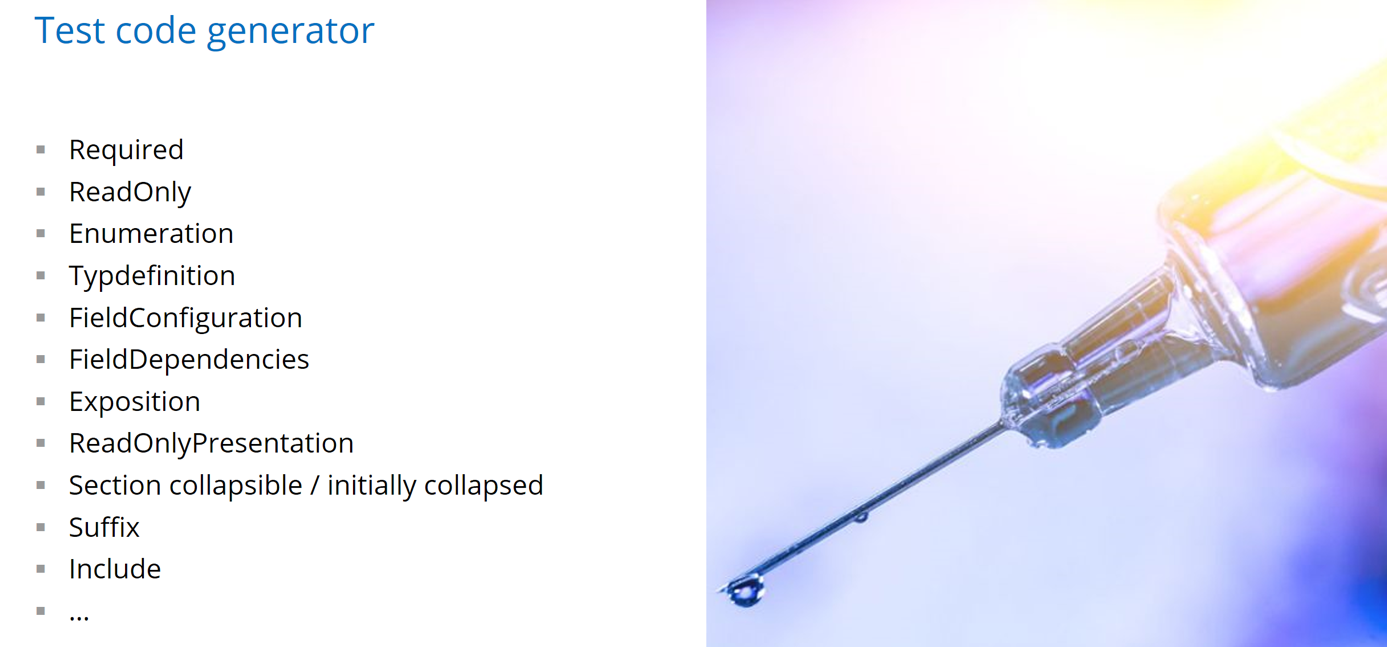
Based on the A12 form model and associated document models, the ATA test code generator meticulously extracts a lot of valuable information such as field configuration, field dependencies, read only information, is a section collapsable, and so on.
Afterwards, it combines this information and generates precious test automation code for the interpreter. Later the interpreter injests this generated test code and is instantly ready to automatically fill or check the corresponding form.
Test code examples
Example1:
Suppose we have a field of field type boolean. The QF-Class “CheckBox” has been assigned to this field type. Since we are generating test code for the language English, the field has the english label “Boolean EN”.
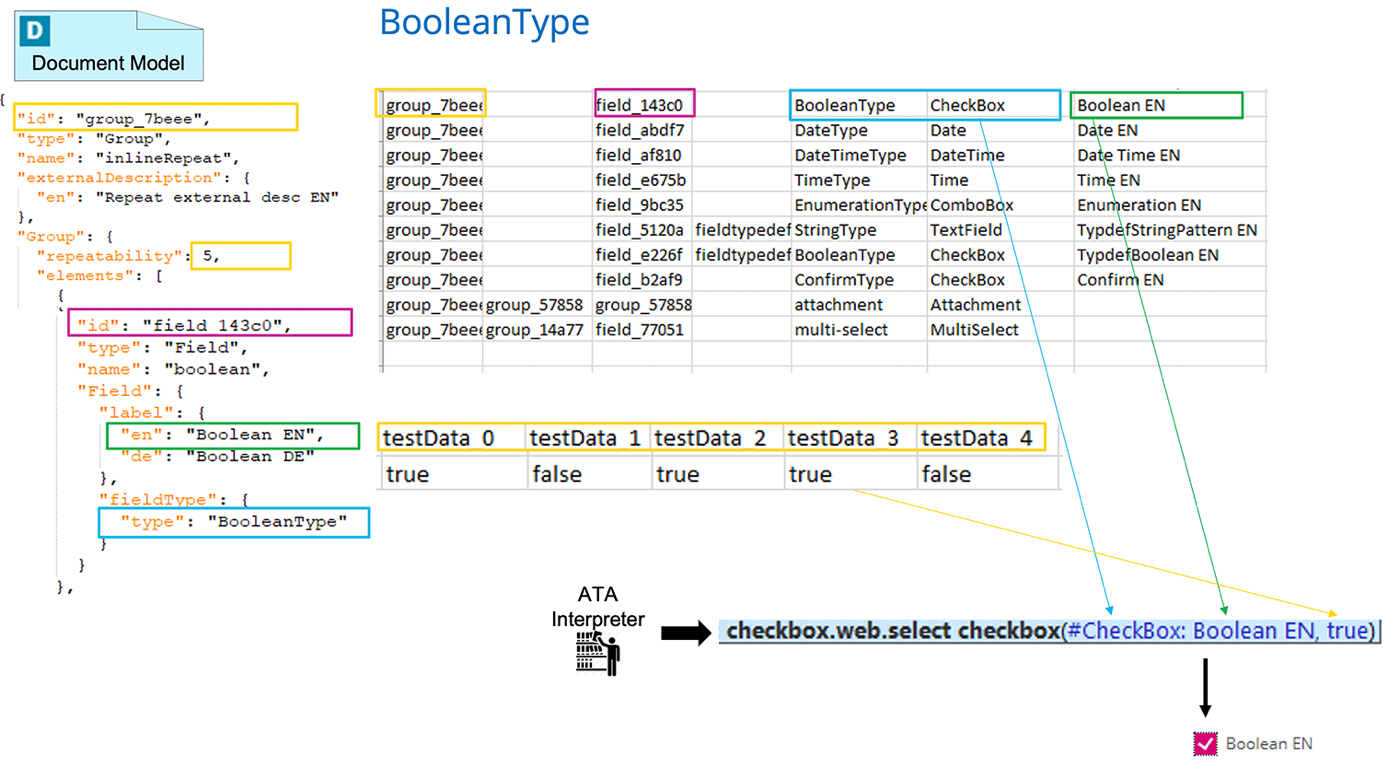
Therefore the field has the SmartID “#CheckBox: Boolean EN”. Running with test dataset 3 the interpreter reads the field SmartID and retrieves the checkbox’s method from its internal library. Then it selects the corresponding checkbox on the UI.
Example2:
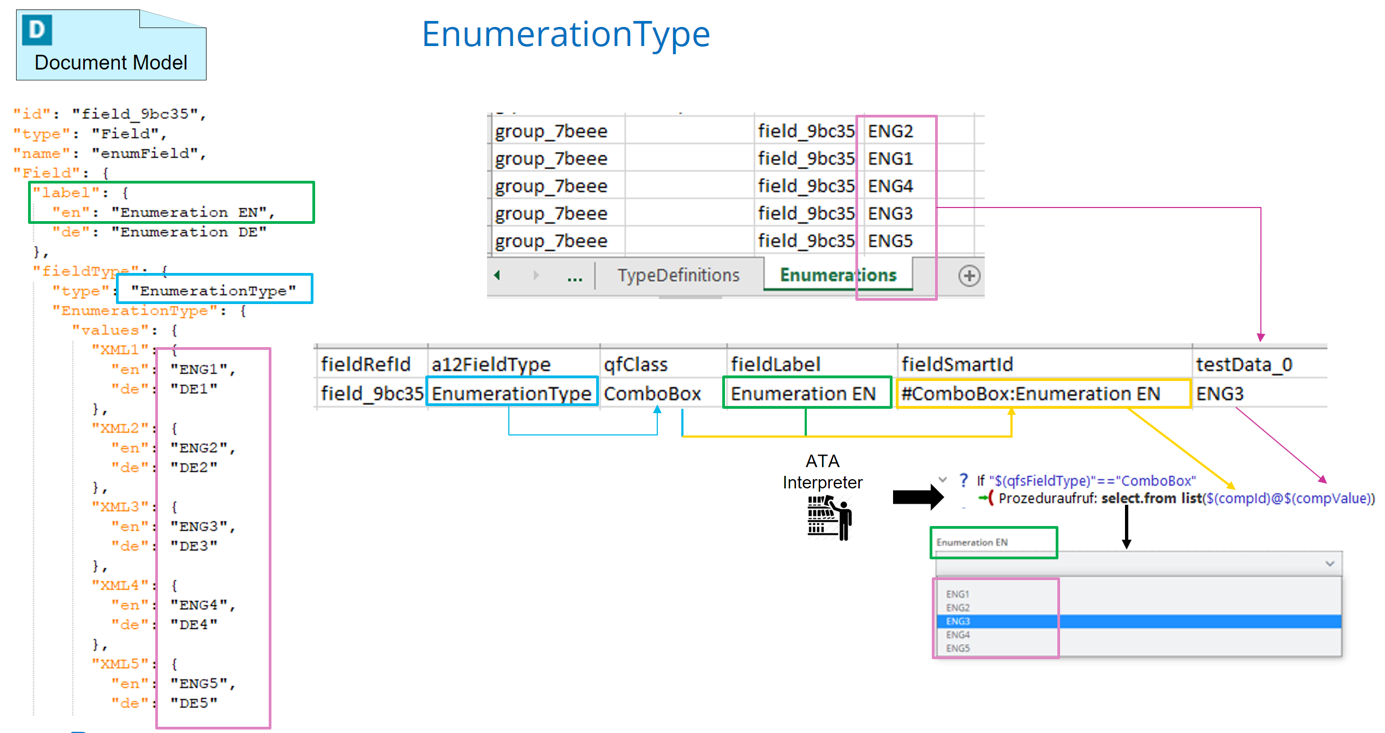
In the second example, we have a field of field type enumeration. The QF-Class “ComboBox” has been assigned to this field type.
This field has the English label “Enumeration EN”. Therefore it has the SmartID “#ComboBox:Enumeration EN ”. Running with a test dataset 0 the interpreter reads the field SmartID and retrieves the ComboBox’s method from its internal library. Then it selects the corresponding value from the ComboBox List on the UI.
In this way, field by field, the interpreter fills the fields of a section, screen, or even the whole form systematically.
Altogether, the model driven ATA saves considerable implementation and maintenance overhead in test automation. It simplifies and accelerates the test automation of A12 applications significantly. It certainly leads to a higher efficiency in test automation.
Deepdive in Resolver mapping
Let assume we have many similar bowl widgets on our UI. We map the A12 HTML data-role attribute bowl to a new QF-Class Bowl. On a side note, QF-Test has many standard classes like TextField, TextArea, Button, and so on. In Addition, you are also able to define – to invent your own new class in the resolver and use it for test automation. Therefore we just define our new class Bowl.
In order to be able to precisely identify blue bowls from the other bowls, we now assign the data-role attribute blue-bowl to the QF-Class bowl having the QF-Class type bluebowl. As with the QF-Classes, we can freely define our own QF-Class types as well.
Now we define a similar mapping for the green bowl. Notebly the notation of a SmartID by type is expressed as follows: #QF-Class\:Type: The backslash in the SmartID is used to escape the colon between the class and the type, as all-black part in the SmartID represents the identification of the widget.
Now we define similar mappings for nuts: blue and green bowl nuts.
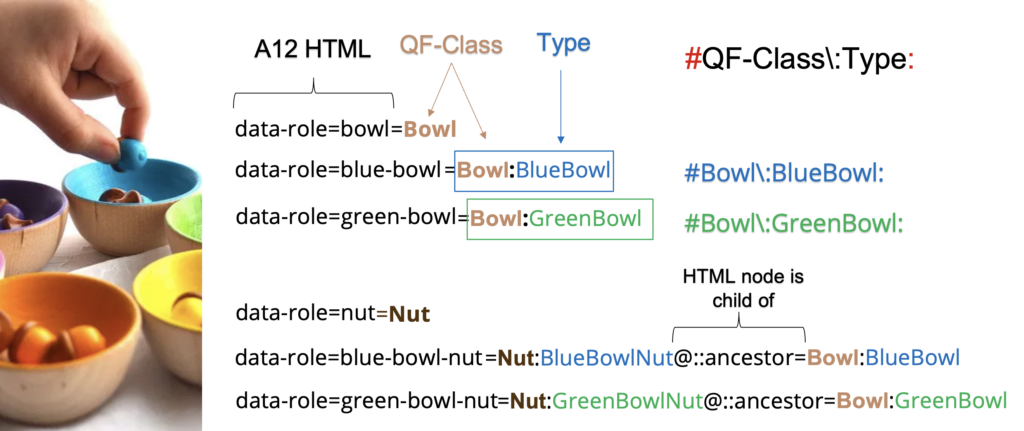
By adding the ancestor notation in the mapping, we can even precisely identify the blue- bowl-nut as the child of the blue-bowl. Similarly the green-bowl-nut is defined as the child of the green-bowl.
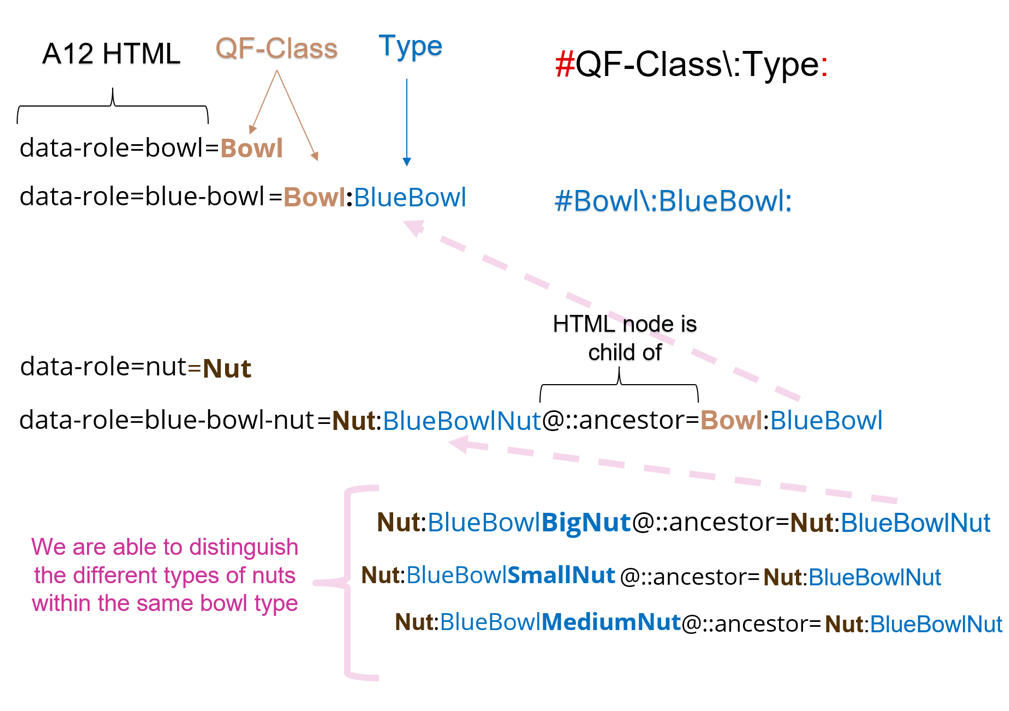
Using the child-parent relationship in combination with QF-Class plus type is a powerful technique that allows us to detect widgets on the UI very accurately. Moreover, if we implement advanced checks or special code for a particular class type in the resolver, the code and therefore the identification of the other types of the same QF-Class remains untouched. This is extremely valuable, especially for resolver extensions or refactorings.
Let’s go one step deeper: We would like to distinguish between the big, small and medium blue-bowl-nuts within a single blue-bowl. Therefore, we map the blue-bowl-big–nut as the child of the blue-bowl-nut, which is itself child of the blue- bowl. In this way, valuable relationships can be easily implemented, making component recognition even more accurate.
In case you have a complex HTML structure that cannot be mapped with a child-parent relationship, you must extend the resolver with the respective algorithm (usually a Groovy script).
The more precisely the identification of the widget is defined in the resolver, the more accurately and stably SmartID will later recognize and control the widget during test automation.
This valuable A12 resolver is available to all A12 projects as an essential part of the A12 test automation catalog. In case of widget changes in A12, the A12 resolver is being adapted to the respective A12 version accordingly. Since these adjustments take place in the resolver centrally every A12 project using the A12 resolver is benefiting automatically.
Altogether A12 provides an amazing test automation catalog that simplifies and accelerates the test automation of A12 applications significantly.